
 You might need to add a bit of gasket behind the O-ring, to stop leaks due to the curvature of the bucket wall.
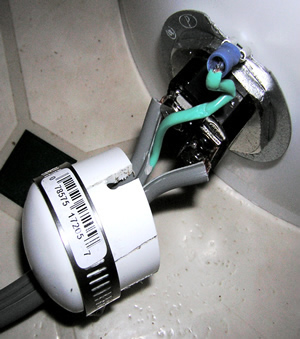
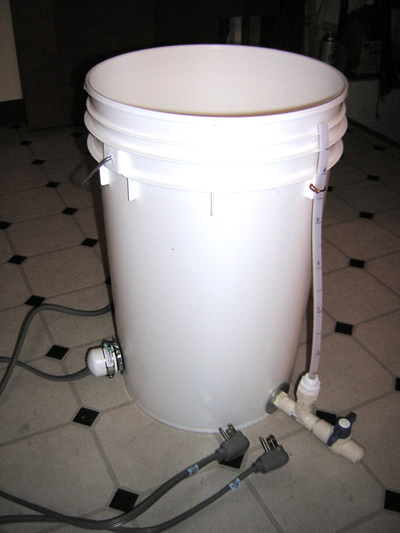
Here's the finished product. You're going to need the following materials:
Look over your supply of plastic buckets. You'll want a seven-gallon HDPE (high-density polyethylene) bucket if you have one, as the extra headroom is helpful. A shorter bucket may require an "extension" added to the top rim to accomodate a vigorous boil. Buckets come in 70 mil (0.070") and 90 mil (0.090") thicknesses, look for a thicker model (labeled NRC 090) as it holds up better to the heat. Don't try to get away with a thinner one.
I purchased two low-watt-density 120 volt 1500 watt hot water heater elements from PlumbingSupply.com. From the same source, I also bought two stainless-steel half connectors. While these have 1 inch NPT threads, they screw down onto the straight threads of the heating elements just fine, as long as there's a gasket in there, too.
For the spigot, I chose to use CPVC plumbing bits. From the assortment of half-inch parts available, you'll need male and female NPT adapters, and a ball valve. If you want a sight glass, also get a tee, another female NPT fitting, and a PEX adapter with NPT threads, along with a bit of PEX tubing that pushes into the adapter. A bit of half-inch CPVC pipe and some cleaner and solvent will round out your kit. I've not finished the end of the spigot, as I'm yet undecided whether to use unions or polysulfone quick-disconnects to attach the kettle to the rest of my gear.
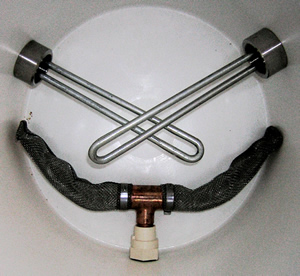
Here is the interior view of the kettle. Shown are the two electric elements, screwed into the half-couplings on the inside of the bucket. Also shown is the Bazooka Screen filter. I had to gently bend it to fit within the bucket along one side rather than straight across the center. This permits me to whirlpool the hot break material into the center of the kettle and not bring it right into the drain. I've tried a stainless Chore-Boy over the pipe end for a strainer, and I've tried using the stainless braid from a sink faucet hose, but both of those occasionally clogged and needed a lot of fiddling to drain the kettle. You may have better luck with them, but I'm quite happy with the Bazooka Screen. It's rigidity helps keep it open and draining even when loaded with lots of hop particles.
The home-made weldless drain adapter shown here is a female pipe thread CPVC adapter for half-inch pipe. The copper tee of the Bazooka Screen is mated to the CPVC with a 1.5 inch length of half-inch copper pipe in a friction fit. It comes apart for cleaning easily, and I can still use the screen in my stainless steel kettle if I want.
The thin black line you can see between the CPVC fitting and the bucket wall is a silicone O-ring.
I cut two holes in the sides of my bucket, about 120° from the spigot. Place one element about an inch off the bottom, or clearing your drain if necessary. Place the other element about half an inch above the first one. Finish these holes carefully, as sharp edges or cracks will be stress points that will start leaks later on. I didn't use sandpaper, but I did smooth them up quite a bit with a fine round file.
Here you can see the dry side of one of the heating elements. Note the green grounding wire, which has a crimp terminal on its end.
CD Pritchard makes a lot of fittings from flattened copper pipe. I'm lazier than that. While wandering the aisles of the local builders' emporium, I found some thin washer-looking things in the electrical section. They are used to shim the holes in electrical boxes, say if you knocked out all the rings and wound up with a hole larger than your conduit. These adapter rings can be used in pairs to make the hole smaller again. They're well-suited for grounding washers, and they come two to a package, besides. I made a tab for the crimp terminals by cutting two slots with a hacksaw along the edge, and snipping off the margins to expose the tab between the slots. This washer then is placed over the element, next to the flange. After that comes the black rubber gasket. Insert the element into the bucket and tighten up the half-coupling from the inside. No need to use a gasket inside the bucket.
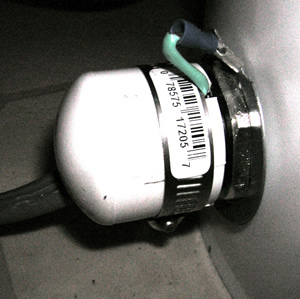
Drill a couple of holes in the end of the PVC pipe cap, and file them into a slot for the electrical cable. This should be a snug fit, as the hole and its position against the element form part of the strain relief holding it all together. Cut half a dozen slots in the open end of the pipe cap, and enlarge one of these for the ground wire to exit as shown at the right.
Slip the cap over the end of your electrical cable, and the hose clamp. Fasten your cable to the terminals securely, and route the ground wire out its slot and fasten it to the ground washer. Slide the pipe cap over the end of the heating element, and tighten the hose clamp down until it grips the element firmly. You don't want to bump up against live wires while brewing, I'm sure!
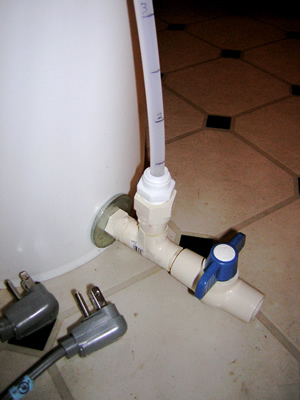
Here's the most original part of my "buggle." Instead of using stainless weldless fittings, I pondered the heat-resistance of CPVC plumbing, which is much cheaper. CPVC is rated up to 200°F under pressure, so I feel we're not pushing it much farther to go to boiling. Plus, I'm using threaded connectors the same size as the stainless weldless ones do, so I can always fall back to metal if I need to.
I used a silicone O-ring on the inside of the threaded connection, and a large washer on the outside. This isn't quite enough, and I noticed a little dribble during the first test boil. I'll add some gasket material behind the washer and we'll see if that makes a difference.
There's nothing special about the CPVC ball valve with it's dashing blue handle, but I'm pleased with the PEX sight tube design. The PEX adapter threads into another NPT adapter, and the PEX tubing just pushes into the top. I filled the bucket pitcher by pitcher, marking the PEX tubing for each half-gallon up to seven. I gently scored the tubing with a knife and marked over the cut with marker to make the lines; this helps keep them from wiping off with time. The top of the sight tube is held upright with a turn of wire passing through a small hole drilled in one of the flanges near the top. I had originally intended to tap holes for nylon bolts through the side of the bucket, this way is neater.
The initial test from tap water to boiling showed that this design can heat 5.5 gallons of water at about 4°F/minute, or from 60°F to boil in about 40 minutes. That's not too bad, in fact that compares favorably with the propane turkey fryer I use outside, especially on a cold and windy day!